前言
去年的时候我有水过一篇文章 Maya 命令 自定义触发 & Mel 源码获取
看标题就知道介绍了 Maya 一些基础的命令调用方式,并且详细介绍了几个好用的 Mel 命令来辅助解析 Maya 回显的命令。
利用whatIs和runTimeCommand可以非常方便查询到背后的命令。
但是使用 Mel 其实有更加 Python 的方法,那就是利用
pymel来实现。
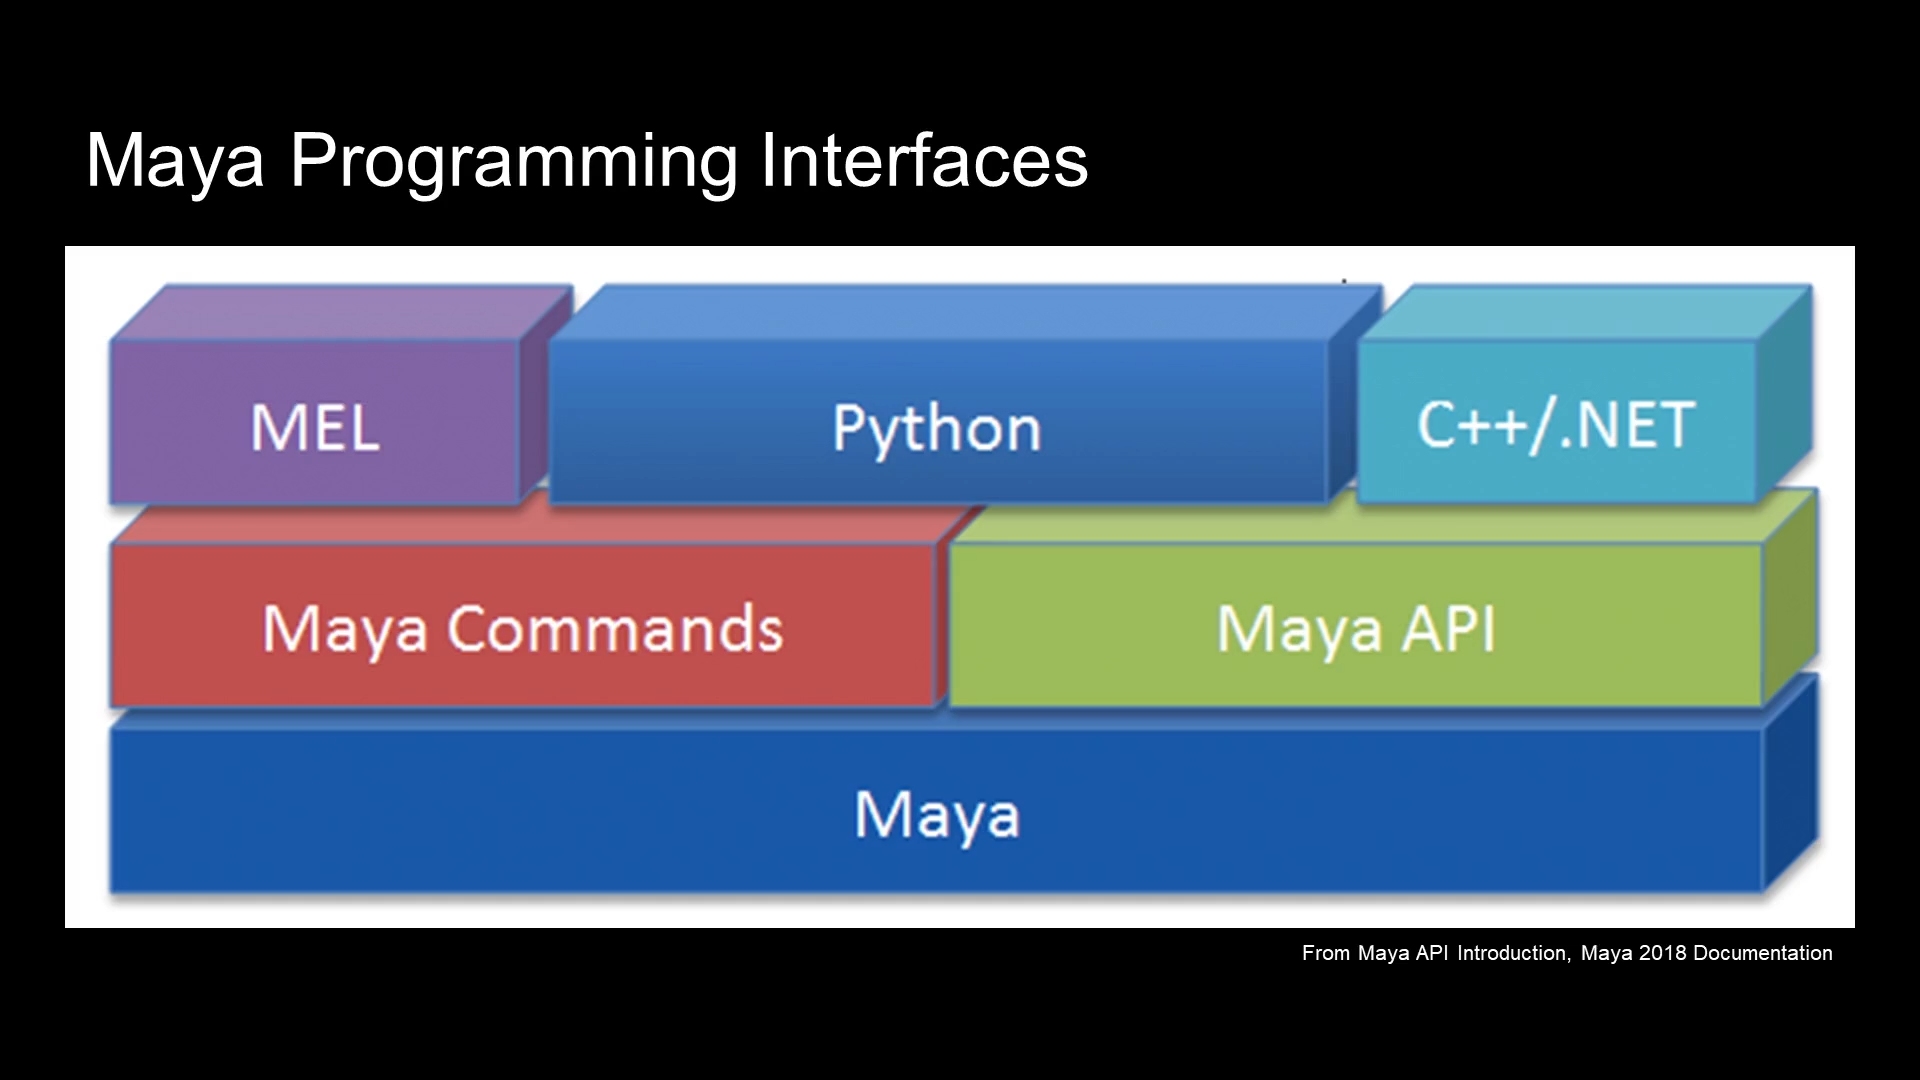
Pymel 调用 Mel
1 | import pymel.core as pm |
直接 pymel.mel 就可以直接类似调用 Python 方法的方式调用 mel 函数。
返回结果和 mel.eval 方法类似。
1 | import pymel.core as pm |
从上面可以看到 mel 是 pymel language.py 脚本中的
Mel类实例。
这个脚本当中还有env和melGlobals的实例
env 的调用可以参考文档链接
melGlobals 这个实例则可以获取到 mel 的全局变量。
1 | import pymel.core as pm |
利用上面的方法,可以完全用 Python 的调用方式来获取 Mel 才能调用的功能。
附注: Mel how to 文档有获取 Mel 所有全局变量的方法 链接
1 | string $allGlobals[] = `env`; |
Pymel 运行 Mel 原理
Mel类重载了__getattr__方法。
1 | def __getattr__(self, command): |
这个方法返回
MelCallable实例。
1 | class MelCallable(object): |
调用的时候会调用
pythonToMelCmd方法,将函数名和参数转换为 mel 语句。
1 | import pymel.core as pm |
最后调用 Mel 类的
_eval的方法来执行 mel 语句。

从上面的代码可以看到
OpenMaya.MGlobal.executeCommand利用 Maya C++ API 实现 mel 代码运行
并通过上面的 返回值处理返回对应的数据。
附注: pm.mel 执行的返回都是字符串,并非是 PyNode 处理过的对象需要特别注意。
实用 Mel 命令汇总
经过上面的操作可以很方便调用 Mel 内置的函数。
因此我们可以了解一下 Mel 内置了哪些便利的函数,可以更加方便地调用,而不需要从零开始写代码。
下面的代码可能默认没有加载到 Maya 里面,直接调用可能会有找不到函数的错误提示。
这个时候可以利用 source 语句 source 脚本来解决问题
1 | pm.mel.isOnlyNurbsSelected() |
如上所示通过 source 方法就可以加载到相关的 Mel 函数了
https://help.autodesk.com/cloudhelp/2018/ENU/Maya-Tech-Docs/Commands/index.html
Mel 命令文档里面有不少函数是 M 后缀的,也就是 Mel 方法特有的,正常情况下无法通过 Python 调用。
当然这些只是记录在文档里面的,还有一些藏在{Maya安装目录}/scripts/others/*.mel这个scripts路径下了。
翻阅里面的 Mel 可以看到很多脚本都是 98 99 写的远古 Mel 代码。
现在新工具新插件的代码都不用 Mel 而是 Python 了。
并且 Mel 有很多函数是复刻 Python 的,比如 startsWith strip dirname basename
除此之外还有很多非常 native 的用法,调用官方的写法更加省心。
copyAttrValues
copyAttrValues全局函数选择两个物体,最后选择物体的通道选择上,会根据选择的通道同步属性值。
用这个函数复制属性值非常便利,不需要再一个值一个值地进行传递。
这个因为要选择对应的属性,更偏向于实际使用,而非代码
duplicateAttr
duplicateAttr和上面函数的用法类似,只是可以复制属性通道。
selectedChannelBoxAttributes
1 | selectedChannelBoxAttributes; |
selectedChannelBoxAttributes获取当前通道盒选中的属性值
selectedChannelBoxPlugs
1 | selectedChannelBoxPlugs; |
selectedChannelBoxPlugs获取当前通道盒选中的通道插槽
selectedChannelBoxObjects
1 | selectedChannelBoxObjects; |
selectedChannelBoxObjects注意必须是选中通道才可以获取到物体
raiseChannelBox & isChannelBoxRaised
raiseChannelBox将通道盒置顶
isChannelBoxRaised判断通道盒是否置顶
findRelatedDeformer
1 | import pymel.core as pm |
利用这个获取到
blendshape等关联的变形器节点。
蒙皮节点也属于变形器的一种,因此也可以获取。
findRelatedSkinCluster
1 | import pymel.core as pm |
与上面的方法类似,只是针对获取蒙皮节点。
利用这个方法获取蒙皮节点非常省事
getFaces & getEdges & getUVs & getVerts
getFacesgetEdgesgetUVsgetVerts
上面四个函数可以在不同的选择的 component 下切换。
attributeExists
1 | import pymel.core as pm |
这个函数可以非常方便地判断属性是否存在。
rootOf & longNameOf & shortNameOf
1 | import pymel.core as pm |
这些功能其实 pymel 都有所覆盖
还有isSameObjectisParentOf就不再赘述了。
getCurrentCamera & getPanelCamera
1 | import pymel.core as pm |
利用 mel 封装的方法可以非常方便获取到当前聚焦的 ModelPanel
缺点就是脚本编辑器下聚焦不在 modelPanel 用 mel 运行获取不到具体的 modelPanel 需要做成 工具架按钮触发才可以。
getCurrentOutlinerPanel
1 | import pymel.core as pm |
获取当前聚焦的 Outliner
同样需要注意在 脚本编辑器下执行聚焦点不在 outliner 没有返回值
getSceneName
1 | import pymel.core as pm |
直接获取当前文件名(不带后缀),可以和
pm.sceneName()方法获取文件路径相辅相成。
getAssignedMaterials & getConnectedShaders & createAndAssignShader
1 | import pymel.core as pm |
getAssignedMaterials可以直接通过 shape 节点获取到关联的材质。
1 | whatIs getAssignedMaterials; |
需要注意这个函数在
unsupported目录下,默认不加载,需要 source 文件,也不排除哪天就没了(:з」∠)
所以我推荐另一个自带的方法getConnectedShaders
1 | import pymel.core as pm |
getConnectedShaders可以快速获取模型的 shadingEngine 节点,通过这个节点可以找到关联的材质。shadingDependNode是所有渲染节点的基类,囊括了所有的材质以及一些不搭噶的渲染节点。
1 | import pymel.core as pm |
getConnectedShaders第二个参数为 True 时可以获取到详细关联 shadingEngine 和 component 的数据。
gotoBindPose
1 | import pymel.core as pm |
绑定下可以利用这个命令回到 bindpose 状态。
deleteIfNotReferenced
1 | import pymel.core as pm |
更加安全的删除命令,无法删除的物体返回 0
replaceNode
https://ilmvfx.wordpress.com/2014/01/27/how-do-i-change-a-materials-type-from-lambert-to-blinn-for-example-using-mel-chs/
参考上面的链接 Mel How-to 系列
这个命令就是实现材质替换的功能,不过理论上可以替换任何 Maya 节点。
1 | import pymel.core as pm |
上面执行生成了两个 方块, 因为利用
replaceNode将 球体生成节点 替换为了 方块生成节点。
总结
以上就是关于 pymel 的用法探索,有机会还要加一篇文章分析 pymel 的实现原理,这个库简直是神器。
虽然 pymel 存在一定的性能问题,但是它的背后其实都是调用 OpenMaya1.0 的API,如果在高性能情况下用 pymel 转换为 C++ 的方式调用,性能未必就差的,pymel 有内置的 api 转换方法,有机会也补充一下~