前言
之前写过一篇文章总结了 ToolMenuEntryScript 可以利用 is_visible 方法来控制 menu_entry 选项的显示 链接
init_unreal json 解析菜单生成分析
之前我做了一个递归方案,只需要修改 json 配置就可以自动生成对应 unreal 菜单选项。 链接 ToolMenuEntryScriptToolMenuEntryScript 类
如上图所示的效果。文档链接
1
2
3
4
5
6
7
8
9
10
11
12
13
14
15
PyToolkit │ PyToolkit.uplugin # 插件目录 │ ... │ └───Content │ └───Python │ │ init_unreal.py # 初始化脚本 │ │ ... │ └───_config │ menu.py # ToolMenuEntryScript 类配置 │ menu.json # 菜单配置 │ ...
首先代码的目录结构如上图所示。文档
相应的 PythonPath 路径有下面文档提到的路径。
在这些路径下添加 Python 包也就可以直接 unreal 里面 import 了
首先要确保知道普通添加菜单的代码是怎么运作的,菜单有哪些选项可以配置的。 链接 链接
完整版本的代码有点长,为了更好地讲清楚代码的运行过程,我将完整代码放到了 Github 仓库上 链接
json 配置最上面定义了父类菜单的名称,这些名称可以通过我之前写的 list_menu 方法获取到,有些菜单需要右键生成了才能获取到 链接
1 2 3 4 5 6 7 8 9 10 11 12 13 14 15 16 17 18 19 20 21 22 23 24 25 26 27 28 29 30 31 32 33 34 35 36 37 38 39 40 41 DIR = os.path.dirname(__file__) CONTENT = os.path.dirname(DIR) CONFIG = os.path.join(CONTENT, "_config" ) def read_json (json_path ): import codecs data = {} try : with codecs.open (json_path, "r" , encoding="utf-8" ) as f: data = json.load(f, object_pairs_hook=OrderedDict) except : import traceback traceback.print_exc() return data def read_config_json (config ): return read_json(os.path.join(CONFIG, "%s.json" % config)) def create_menu (): menu_json = read_config_json("menu" ) fail_menus = {} for tool_menu, config in menu_json.items(): menu = menus.find_menu(tool_menu) if not menu: fail_menus.update({tool_menu: config}) continue config.setdefault("menu" , menu) handle_menu(config) menus.refresh_all_widgets() return fail_menus fail_menus = create_menu()
handle_menu 分为 4 个部分,都是对 json 配置里面的相应选项进行配置,如过没有配置选项则利用 for 空循环来跳过。
1 2 3 4 5 6 7 8 9 10 11 12 for section, config in data.get("section" , {}).items(): config = config if isinstance (config, dict ) else {"label" : str (config)} config.setdefault("label" , "untitle" ) insert = INSERT_TYPE.get(config.get("insert_type" , "" ).upper()) insert and config.update({"insert_type" :insert}) insert_name = config.get("insert_name" ) config["insert_name" ] = insert_name if insert_name else "None" menu.add_section(section, **config)
这里会判断 section 配置是否是配置或是纯粹的字符串。
1
2
3
4
5
6
7
8
9
10
"ContentBrowser.AddNewContextMenu" : { "section" : { "new_asset_section" : { "label" : "PyToolkit 创建新资源菜单嵌入测试" , "insert_name" : "ContentBrowserNewAdvancedAsset" , "insert_type" : "AFTER" } , "other_asset_section" : "PyToolkit 其他的 section" } }
上面的两种 section 配置都是可以的。
1 2 3 4 5 6 7 for prop, value in data.get("property" , {}).items(): if prop == "menu_owner" or value == "" : continue elif prop == "menu_type" : value = MENU_TYPE.get(value.upper()) menu.set_editor_property(prop, value)
这里的 menu_type 可以定义菜单选项的类型,从而显示不同效果。
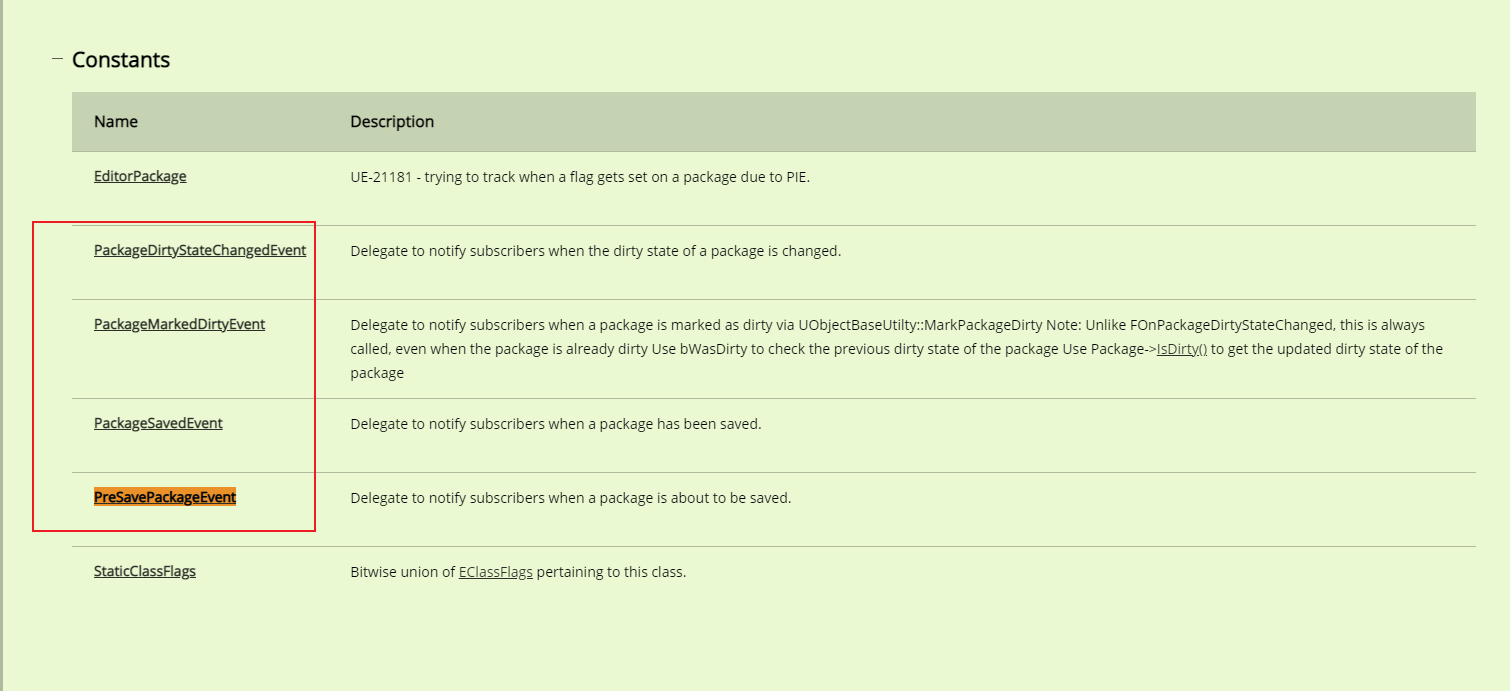
1
2
3
4
5
6
7
8
9
10
11
12
13
14
15
16
17
18
{ "LevelEditor.LevelEditorToolBar" : { "property" : { "close_self_only" : "" , "menu_name" : "" , "menu_owner" : "" , "menu_parent" : "" , "menu_type" : "" , "prevent_customization" : "" , "searchable" : "" , "should_close_window_after_menu_selection" : "" , "style_name" : "" , "tool_bar_force_small_icons" : "" , "tool_bar_is_focusable" : "" , "tutorial_highlight_name" : "" } } }
菜单的选项可以配置这些选项,大部分都是字符串选项所以,也不需要代码额外的处理
1 2 3 4 5 6 7 8 9 10 11 12 13 14 15 16 17 18 19 20 21 22 23 24 25 26 27 28 29 30 31 32 33 34 35 36 37 38 39 40 41 42 COMMAND_TYPE = { "COMMAND" : unreal.ToolMenuStringCommandType.COMMAND, "PYTHON" : unreal.ToolMenuStringCommandType.PYTHON, "CUSTOM" : unreal.ToolMenuStringCommandType.CUSTOM, } INSERT_TYPE = { "AFTER" : unreal.ToolMenuInsertType.AFTER, "BEFORE" : unreal.ToolMenuInsertType.BEFORE, "DEFAULT" : unreal.ToolMenuInsertType.DEFAULT, "FIRST" : unreal.ToolMenuInsertType.FIRST, } MENU_TYPE = { "BUTTON_ROW" : unreal.MultiBoxType.BUTTON_ROW, "MENU" : unreal.MultiBoxType.MENU, "MENU_BAR" : unreal.MultiBoxType.MENU_BAR, "TOOL_BAR" : unreal.MultiBoxType.TOOL_BAR, "UNIFORM_TOOL_BAR" : unreal.MultiBoxType.UNIFORM_TOOL_BAR, "VERTICAL_TOOL_BAR" : unreal.MultiBoxType.VERTICAL_TOOL_BAR, } ENTRY_TYPE = { "BUTTON_ROW" : unreal.MultiBlockType.BUTTON_ROW, "EDITABLE_TEXT" : unreal.MultiBlockType.EDITABLE_TEXT, "HEADING" : unreal.MultiBlockType.HEADING, "MENU_ENTRY" : unreal.MultiBlockType.MENU_ENTRY, "NONE" : unreal.MultiBlockType.NONE, "TOOL_BAR_BUTTON" : unreal.MultiBlockType.TOOL_BAR_BUTTON, "TOOL_BAR_COMBO_BUTTON" : unreal.MultiBlockType.TOOL_BAR_COMBO_BUTTON, "WIDGET" : unreal.MultiBlockType.WIDGET, } ACTION_TYPE = { "BUTTON" : unreal.UserInterfaceActionType.BUTTON, "CHECK" : unreal.UserInterfaceActionType.CHECK, "COLLAPSED_BUTTON" : unreal.UserInterfaceActionType.COLLAPSED_BUTTON, "NONE" : unreal.UserInterfaceActionType.NONE, "RADIO_BUTTON" : unreal.UserInterfaceActionType.RADIO_BUTTON, "TOGGLE_BUTTON" : unreal.UserInterfaceActionType.TOGGLE_BUTTON, }
字符串映射到 Unreal 对象,利用 Python 的 upper 处理,可以让配置不用区分大小写。
1 2 3 4 5 6 7 8 9 10 11 12 13 14 15 16 17 18 19 20 21 22 23 24 25 26 27 28 29 30 31 32 33 34 35 36 37 38 39 40 41 42 43 44 45 46 47 48 49 50 51 52 53 54 55 56 57 for entry_name, config in data.get("entry" , {}).items(): label = config.get("label" , "untitle" ) prop = config.get("property" , {}) for k in prop.copy(): v = prop.pop(k) if v and k in ["name" , "tutorial_highlight_name" ]: prop[k] = v if k == "insert_position" : position = INSERT_TYPE.get(v.get("position" , "" ).upper()) v["position" ] = ( position if position else unreal.ToolMenuInsertType.FIRST ) v["name" ] = v.get("name" , "" ) prop[k] = unreal.ToolMenuInsert(**v) elif k == "type" : typ = ENTRY_TYPE.get(str (v).upper()) prop[k] = typ if typ else unreal.MultiBlockType.MENU_ENTRY elif k == "user_interface_action_type" : typ = ACTION_TYPE.get(str (v).upper()) typ and prop.update({k: typ}) elif k == "script_object" : script_class = getattr (MENU_MODULE, v, None ) if script_class and issubclass ( script_class, unreal.ToolMenuEntryScript ): script_object = script_class() context = unreal.ToolMenuContext() script_label = str (script_object.get_label(context)) if not script_label: @unreal.uclass() class RuntimeScriptClass (script_class ): label = unreal.uproperty(str ) @unreal.ufunction(override=True ) def get_label (self, context ): return self.label script_object = RuntimeScriptClass() script_object.label = label prop[k] = script_object prop.setdefault("name" , entry_name) prop.setdefault("type" , unreal.MultiBlockType.MENU_ENTRY) entry = unreal.ToolMenuEntry(**prop) entry.set_label(label) typ = COMMAND_TYPE.get(config.get("type" , "" ).upper(), 0 ) command = config.get("command" , "" ).format (**FORMAT_ARGS) entry.set_string_command(typ, "" , string=command) menu.add_menu_entry(config.get("section" , "" ), entry)
这个配置看似很复杂,其实大部分都是处理 字符串 到 Unreal 对象的映射而已,处理逻辑和上面的代码差不太多。script_object 的处理。
1 2 3 4 5 6 7 DIR = os.path.dirname(__file__) CONTENT = os.path.dirname(DIR) CONFIG = os.path.join(CONTENT, "_config" ) menu_py = os.path.join(CONFIG, "menu.py" ) MENU_MODULE = imp.load_source("__menu__" , menu_py) if os.path.exists(menu_py) else None
MENU_MODULE 通过 import 导入进来。ToolMenuEntryScript 类。
1 2 3 4 5 6 7 8 9 10 11 for entry_name, config in data.get("sub_menu" , {}).items(): init = config.get("init" , {}) owner = menu.get_name() section_name = init.get("section" , "" ) name = init.get("name" , entry_name) label = init.get("label" , "" ) tooltip = init.get("tooltip" , "" ) sub_menu = menu.add_sub_menu(owner, section_name, name, label, tooltip) config.setdefault("menu" , sub_menu) handle_menu(config)
最后通过 sub_menu 递归解析数据,其中 sub_menu 会多出一个 init 选项
1
2
3
4
5
6
7
8
9
10
11
12
13
14
15
16
17
18
19
20
21
22
23
24
25
26
27
28
29
30
31
32
33
34
35
36
37
38
39
40
41
42
43
44
45
46
47
48
49
50
51
52
{ "ContentBrowser.AddNewContextMenu" : { "section" : { "new_asset_section" : { "label" : "PyToolkit 创建新资源菜单嵌入测试" , "insert_name" : "ContentBrowserNewAdvancedAsset" , "insert_type" : "AFTER" } } , "sub_menu" : { "py_menu" : { "init" : { "label" : "PyToolkit测试" , "section" : "new_asset_section" , "tooltip" : "PyToolkit 创建新资源菜单嵌入测试" } , "section" : { "Test" : "测试" } , "entry" : { "Common" : { "section" : "Test" , "label" : "演示:新资源菜单触发(打印到屏幕)" , "type" : "PYTHON" , "command" : "unreal.SystemLibrary.print_string(None,'新资源菜单触发',text_color=[255,255,255,255])" } } , "sub_menu" : { "test_menu" : { "init" : { "label" : "PyToolkit 多重 sub_menu" , "section" : "new_asset_section" , "tooltip" : "PyToolkit 多重 sub_menu" } , "section" : { "Test" : "测试" } , "entry" : { "Common" : { "section" : "Test" , "label" : "演示:新资源菜单触发(打印到屏幕)" , "type" : "PYTHON" , "command" : "unreal.SystemLibrary.print_string(None,'新资源菜单触发',text_color=[255,255,255,255])" } } } } } } } }
可以看那到其他的解析通过递归调用 handle_menu 的方式从新配置,因此 sub_menu 可以无限套娃。
贴图 resize 选项配置
经过上面的说明,就可以用过 script_object 指定 menu.py 里面配置的类
1 2 3 4 5 6 7 8 9 10 11 12 13 14 15 16 17 18 19 20 21 22 23 24 25 26 27 28 29 30 31 32 33 import unrealutil_lib = unreal.EditorUtilityLibrary @unreal.uclass() class TextureReimport (unreal.ToolMenuEntryScript): @unreal.ufunction(override=True ) def is_visible (self,context ): types = (unreal.Texture,) assets = [asset for asset in util_lib.get_selected_assets() if isinstance (asset,types)] return bool (assets) @unreal.ufunction(override=True ) def get_tool_tip (self,context ): return u'重导贴图并且按照规范压缩图片大小' @unreal.uclass() class UVCapture (unreal.ToolMenuEntryScript): @unreal.ufunction(override=True ) def is_visible (self,context ): print (self.label) types = (unreal.StaticMesh,unreal.SkeletalMesh) assets = [asset for asset in util_lib.get_selected_assets() if isinstance (asset,types)] return bool (assets) @unreal.ufunction(override=True ) def get_tool_tip (self,context ): return u'输出模型 UV 边界图'
于是利用上面类的 is_visible 方法就可以控制菜单选项是否可见,目前的缺点是 子菜单 没法用这种方式隐藏,只能处理菜单项。
贴图大小自动 resize
终于经过很长的铺垫之后,来到本篇文章的核心内容,怎么做到右键菜单直接调整 贴图的尺寸。Github
老版本可以在 Maya 或者 PS 里面拿到。
Maya 的版本老一点,但是大小更小。
imagemagick 如何使用可以参考我之前写的一篇文章 链接 ,写得不太好有点东拼西凑请见谅。
思路就是获取 texture 导入的路径,然后将原图挪动到 临时目录下 。
1
2
3
4
5
6
7
8
9
10
11
12
13
14
15
16
17
18
19
20
21
22
23
24
25
26
27
28
29
30
31
32
33
34
35
36
37
38
39
40
41
42
43
44
45
46
47
48
49
50
51
52
53
54
55
56
57
58
59
60
61
62
63
64
65
66
67
68
69
70
71
72
73
74
75
76
77
78
79
80
81
82
83
84
85
86
87
88
89
import osimport sysimport shutilimport tempfileimport subprocessimport contextlibimport unrealDIR = os.path.dirname(__file__) PLUGIN = "PyToolkit" plugins = unreal.Paths.project_plugins_dir() bin = os.path.join(plugins, PLUGIN, "bin" )CONVERT = os.path.abspath(os.path.join(bin , "convert.exe" )) util_lib = unreal.EditorUtilityLibrary asset_tool = unreal.AssetToolsHelpers.get_asset_tools() def texture_import_task (filename="" , destination="" ): task = unreal.AssetImportTask() task.set_editor_property("automated" , True ) task.set_editor_property("destination_path" , destination) task.set_editor_property("filename" , filename) task.set_editor_property("replace_existing" , True ) task.set_editor_property("save" , True ) return task def resize_texture (texture_path, size ): assert size != 0 , "贴图大小不能为0" commands = [ '"%s"' % CONVERT, '"%s"' % texture_path, "-channel RGBA" , "-separate" , "-resize %sx%s" % (size, size), "-combine" , '"%s"' % texture_path, ] command = " " .join(commands) subprocess.call(command, shell=True ) @contextlib.contextmanager def copy_texture (texture_path, size ): texture_name = os.path.basename(texture_path) temp_path = os.path.join(tempfile.gettempdir(), texture_name) if size: os.path.exists(temp_path) and os.remove(temp_path) shutil.copyfile(texture_path, temp_path) resize_texture(texture_path, size) yield if size: os.path.exists(texture_path) and os.remove(texture_path) shutil.copyfile(temp_path, texture_path) os.path.exists(temp_path) and os.remove(temp_path) def main (): size = next (iter (sys.argv[1 :]), 0 ) size = abs (int (size)) if size.isdigit() else 0 for texture in util_lib.get_selected_assets(): if not isinstance (texture, unreal.Texture): continue data = texture.get_editor_property("asset_import_data" ) texture_path = data.get_first_filename() path = texture.get_outer().get_path_name() msg = "贴图文件不存在,请重新导入\n引擎路径: %s\n贴图路径: %s" % (path, texture_path) assert os.path.exists(texture_path), msg asset_folder, name = os.path.split(texture.get_outer().get_path_name()) texture_path = os.path.abspath(texture_path) with copy_texture(texture_path, size): task = texture_import_task(texture_path, asset_folder) name and task.set_editor_property("destination_name" , name) asset_tool.import_asset_tasks([task]) if __name__ == "__main__" : main()
处理结果就像开头看到的那样。
总结
使用 imagemaick 处理还是会有点问题,美术回反馈用这个工具缩图和 PS 的比例缩放调整不一样。(:з」∠)
另外上面的工具有个问题,如果图片的原图已经不在了就无法执行了。
2021-08-25 更新
其实引擎里面也有缩图的参数,可以实现类似 PS 的缩图效果。
后来经过评估,采用了引擎自带的缩图效果就可以解决问题,无需用 imagemagick 自动处理