前言
记录一下这周搞到头秃的需求。
需要修改修改蓝图组件的属性。
过去我修改组件属性都是通过 Actor 实现。
但是 Actor 需要在 Game World 当中进行修改,而这个时候其实是已经实例化了。
这里需要将值赋值到蓝图当中,等于下次生成 Actor 的时候已经自动带有配置好的初始值了。
原先我觉得 Actor 修改就是分分钟的事,蓝图相信也可以直接获取进行修改吧。
然而我是图样图森破了(:з」∠)
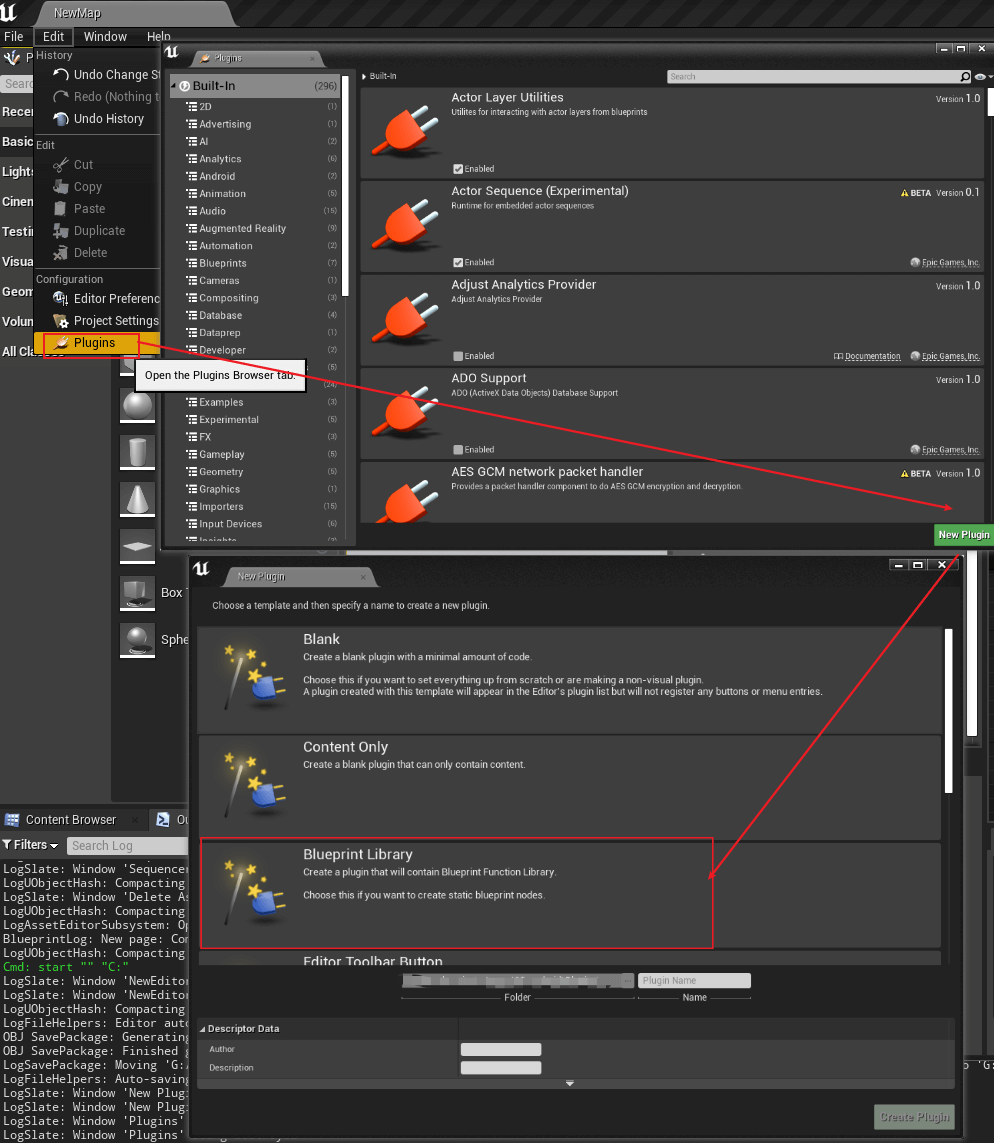
修改蓝图组件属性尝试
我之前修改资源的属性,比如说修改 Texture2D 资源,都需要通过 Content Browser 获取当前选择的 Asset 资源。
然后通过 Python 的 set_editor_property 来实现修改。
所以最开始我也是沿着这个方向去尝试的。
1 | import unreal |
通过上面的方法可以获取到当前选择的 蓝图 Asset。
但是去 Python 文档查 Asset 完全没有任何有价值的方法可以获取到它内部的 Component 链接
最初是想通过 Actor 的 component 看看有没有办法获取到 蓝图 内部的 Component , 然并卵 ~
于是我开始走弯路了。
我想到蓝图编辑器窗口既然可以获取到这些 Component ,应该会有相关的线索的。
所以我开始查阅引擎的源码,希望能够从中找到解决方案~
蓝图编辑窗口 SCSEditor 源码查阅
首先要快速定位蓝图编辑器的源码位置。
依然是使用老办法,通过 Tooltip 来定位最快。

然后可以定位到
SBlueprintEditorToolbar.cpp脚本,并且可以定位模块在引擎的 Kismet 文件夹里面。
由于这里面的代码已经非常多了,所以新开一个 VScode 在 Kismet 目录下进行快速的搜索。
下一步我要获取的左侧的 Component 树状图的结构。
于是我又找了个简单的 Tooltip 来定位
这里可以直接定位到
SCSCEditor.cpp脚本,
然后就开始了我更大弯路的阅读源码,其中还去找了右侧的 Detail 界面生成逻辑去看,但是其实是我想多了。
我只要找到 蓝图的 Component 是怎么生成出树的即可。
后来总算找到了对的 函数
OnApplyChangesToBlueprint
当蓝图的 Component 有任何的变动应该就会触发这个函数来进行 组件树的更新
Component 更新相关的逻辑就是红框框住的部分。
可以看到这其中有一个关键操作。
1 | AActor* Actor = GetActorContext(); |
这个操作通过 Actor 获取类,然后再通过 类 获取 DefaultObject 来进行操作。
这个变量的命名就很灵性,于是去查一下 unreal cdo 相关的内容,然后可以追查到 AnswerHub 链接
根据最佳回答可以知道, CDO 是 Unreal 的 Class Default Object 的简称。
专门用来存储 类 的实例化初始值对象,也就是当 类实例化的时候,会通过反射系统从 CDO 对象中取值。
所以针对蓝图这种就更为重要,因为蓝图其实是一个 C++ 类生成器,可以简单理解为 Compile 的时候生成相应的 C++ 类以及对应的 Class Default Object
进而通过 Class Default Object 来衍生出其他的实例。
所以修改蓝图 Component 的属性,本质上就是要修改 Class Default Object 即可。
Python 尝试修改 CDO
通过上面的 C++ 源码,我想到在游戏场景里面获取 Actor 然后模仿上面的方式获取类。
1 | import unreal |
果然 Actor 获取到的 Class 是特殊的 BlueprintGeneratedClass
然而在 Python 里面也提供太多特殊的调用方式。
我用 dir 列出这个类可以调用的方法,发现还有 get_default_object 方法,继承于unreal._ObjectBase链接
1 | import unreal |
然而类的显示路径虽然变了,但是实际上的类型是不对的,我要获取到 Actor 类型才是对的。
于是我又搜索了一下关于 Python 蓝图 修改 CDO 相关的信息,还真的搜到官方的工程师提供的方案 链接
没想到官方工程师给的方案更加简单,可以直接从蓝图路径中获取到 CDO ,只需要在路径上加上_C后缀 ,Actor获取也给省了。
我测试了官方的代码,通过unreal.get_default_object这个方法获取到的 object 是 Actor 类型,是对的。
1 | import unreal |
本来以为官方提供的就是最佳解决方案,困扰良久的问题总算解决了。
最后证明我还是太Naive
当我获取 Actor 的 root_component 之后,我发现没法获取 component。
1 | import unreal |
上面测试用的蓝图比较简单,我当时用项目的蓝图还是可以获取到 root_component 但是获取不到它的子对象。
于是到头来 Python 还是无法解决这个问题。
C++ 获取 CDO Component
我又追查了一下 C++ 的 API 。
发现 Actor 可以通过GetComponents获取
1 | TArray<UActorComponent *> UPyToolkitBPLibrary::GetCDOInheritedComponents(AActor *CDO) |
但是只是这样还是没法获取全部的 Component , 一些后续添加的 Component 还是通过 Python 无法获取。
于是我又开始去查 SCSCEditor.cpp 的源码,因为我相信既然可以生成组件树,一定是可以获取到 Component 的。
但是当时总是想着 Component 的线索去追查,完全没想到这个东西居然和 Node 有关。
所以就踩了个巨坑,浪费了好多时间,然后最后实在没办法了,找了程序来帮忙,然后程序也没有搞过,还是得自己查。
最后又从网上挣扎了一下,没想到找到了解决方案 链接
1 | TArray<UActorComponent *> UPyToolkitBPLibrary::GetCDONodeComponents(AActor *CDO) |
SimpleConstructionScript获取到USimpleConstructionScript这个类
这个类是 蓝图生成 Actor 的时候调用给 Actor 添加组件用的。
这里并不包含所有的 Component ,只有一些蓝图额外添加的 Component 才会放到这里。
还好有人已经做好了获取的参考代码,要我自己查到是这么个逻辑估计得天荒地老了(:з」∠)
于是通过上面这个蓝图的暴露就可以获取到 蓝图 中所有的 Component (但是是没有层级关系的)
直接获取的 Component 中用set_editor_property设置值,就可以实现蓝图 Component 的修改了~
由于项目使用了一些自定义的 Component 组件,每每都要去查 C++ 源码看有什么 property 可以设置是非常不方便的。
幸好之前推荐多次的 Unreal Python 教程已经提供了解决方案 链接
1 | TArray<FString> UPyToolkitBPLibrary::GetAllProperties(UClass *Class) |
最新版本的引擎提示
UProperty改名为了FProperty
目前编译可以通过,估计下一个版本就会直接报错了,所以这里我稍稍修改了一下。
通过这个方法就可以确切知道组件下有什么属性可以通过 Python 进行设置了。
2021-6-1 更新 - 不需要 C++ 更新
最近才发现 CDO 对象可以直接获取到子对象,不需要 C++ 辅助这么麻烦。
不过这个获取也只限于继承于 C++ 的蓝图,如果是蓝图里面手动添加的,依然无法直接通过 cdo 对象获取
但是如果是实例化到场景中的 Actor ,倒是可以直接get_editor_property获取到
1 | import unreal |
获取到的对象可以直接进行修改。
1 | capsule = bp_cdo.get_editor_property("CapsuleComponent") |
如上可以设置胶囊体的半径,但是需要关闭蓝图窗口再打开才能看到视图的更新
总结
一个人搞 Unreal Python 就是痛苦无比,所有的雷都得自己解决。
解决需求根本无法评估到底需要多少时间(:з」∠),这次就踩到了天坑.
真正解决问题的代码其实也就那么几行就够了,但是走了弯路就耗费了好多倍的时间o(╥﹏╥)o
ε=(´ο`*)))唉,但是就像我昨天吐槽的一样, C++ 的开发效率实在是太低了,能用 Python 还是尽量用 Python 解决了。